Google Pay on websites: using our MyCheckout hosted payment pages
Accepting Google Pay via the MyCheckout hosted payment pages is the easiest way to offer Google Pay on your website. The MyCheckout hosted payment pages will perform every step in the Google Pay checkout flow. It will show the Google Pay button, bring up the payment sheet, collect the payment token and complete the payment via the Connect backend. All while maintaining a native and secure experience for your consumer. The checkout page your consumer sees is customizable with the MyCheckout Editor, to ensure the look and feel matches your website. You can find the MyCheckout editor in the configuration center under the section Look & Feel.
You only need to take care of the following steps:
- Enabling Google Pay with us
- Set up Google Pay in the configuration center
- Technical integration:
- Providing the merchantCustomerId in the CreateHostedCheckoutRequest in case you are not sending this yet
- Providing the threeDSecure object in the CreateHostedCheckoutRequest in case you are not sending this yet
- Selecting in the MyCheckout Editor the button you want to show on the MyCheckout hosted payment pages in case you do not want the default button
Enabling Google Pay on your account
First make sure Google Pay is enabled for the account (merchantId) you have with us. To do so contact your account manager, who will work together with your implementation manager. They will be able to set the product up for you. You will also need to have regular card products configured in case you use Google Pay, as Google Pay allows consumers to pay with regular PANs and these transactions will be processed as regular card payments. Next to that, ensure the normal fraud validations are enabled for the regular card products you have configured, as these will be used on the Google Pay regular PAN transactions.
Set up in the configuration center
In order to offer Google Pay in the MyCheckout hosted payment pages you only have to register your merchant name and merchant origin. Your consumers will see the merchant name you provided in the payment sheet, before confirming the payment.
To do so, sign in to the configuration center, go to Google Pay and select "Add your details". Please note that Google Pay needs to be enabled for your account before you can enter your details in the configuration center.
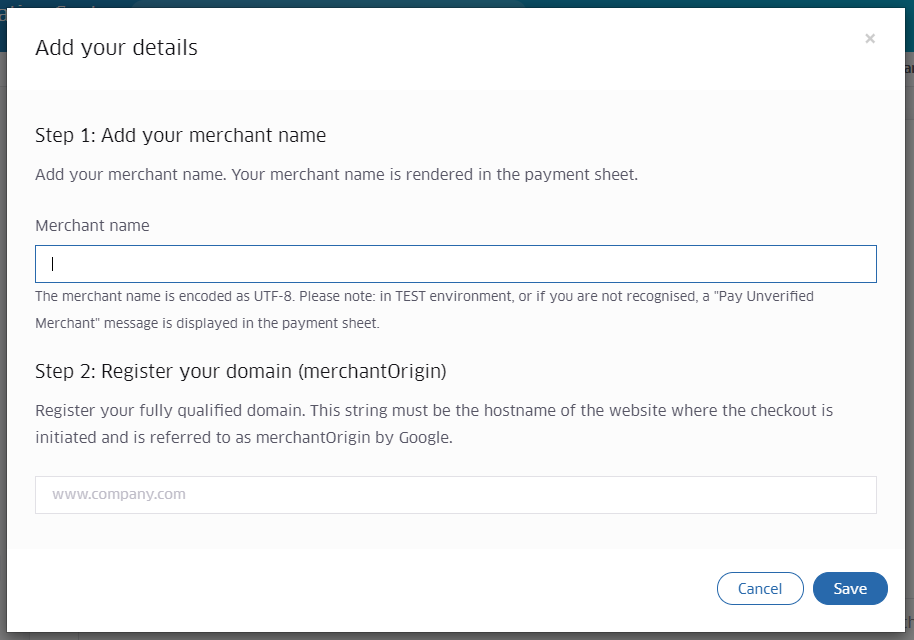
- Provide a merchant Name: A human readable string that contains your company‘s name and that is suitable for display in the payment sheet as explained on Google's developer site.
- Provide the merchantOrigin: The URL on which you host your webshop where the checkout is initiated, as explained on Google's developer site.
You do not need a separate Google merchant ID in case you use Google Pay on the MyCheckout hosted payment pages.
Google Pay will only be available for your consumers after you have either provided the merchantName and merchantOrigin in the configuration center or if you provide these values alternatively in your createHostedCheckoutRequest as described below.
Technical integration
When you already make use of the MyCheckout hosted payment pages on your website, integrating Google Pay is easy. If you have configured your merchantName and merchantOrigin, Google Pay will work almost without any extra changes.
You only need to provide a value for the field order.customer.merchantCustomerId. In case your consumer pays with a card stored in their Google account, which is not tokenized on the device, this card is considered a regular card. To ensure this regular card is processed correctly on our platform, the merchantCustomerID needs to be provided, which is your identifier for the customer. It is a string which can have up to 15 characters. The merchantCustomerId can be used as a search criteria in the Payment Console and is also included in the GlobalCollect report files.
Below you find an example create hosted checkout request.
  {
  "order": {
    "amountOfMoney": {
      "currencyCode": "EUR",
      "amount": 2344
    },
    "customer": {
      "merchantCustomerId": "Your ID of the consumer",
      "billingAddress": {
        "countryCode": "NL"
      }
    }
  },
  "mobilePaymentPaymentMethodSpecificInput": {
    "paymentProduct320SpecificInput": {
      "threeDSecure": {
        "challengeIndicator": "no-preference",
        "challengeCanvasSize": "250x400",
        "exemptionRequest": "automatic",
        "skipAuthentication": "false"
      }
    }
  },
  "hostedCheckoutSpecificInput": {
    "variant": "100",
    "locale": "en_GB"
  }
}
In case you use the MyCheckout hosted payment, you do not need to register with the Google Pay Business Console. You also do not need to ask for specific production access or to obtain a merchantId.
Overriding the configured merchantName and merchantOrigin
We offer the option to override your configured merchantName and merchantOrigin when creating the Hosted Checkout session via the API. This can be done by providing the new value in the API request as shown in the example below. Please ensure the merchantName is a human readable string that contains your company's name and that is suitable for display in the payment sheet and that the merchantOrigin contains the URL on which you host your webshop where the checkout is initiated. Both are explained on Google's developer site.
    {
  "order": {
    "amountOfMoney": {
      "currencyCode": "EUR",
      "amount": 2344
    },
    "customer": {
      "merchantCustomerId": "",
      "billingAddress": {
        "countryCode": "NL"
      }
    },
    "mobilePaymentMethodSpecificInput": {
      "paymentProduct320SpecificInput": {
        "merchantName": "",
        "merchantOrigin": "",
        "threeDSecure": {
          "challengeIndicator": "no-preference",
          "challengeCanvasSize": "250x400",
          "exemptionRequest": "automatic",
          "skipAuthentication": "false"
        }
      }
    },
    "hostedCheckoutSpecificInput": {
      "variant": "100",
      "locale": "en_GB"
    }
  }
}
New Hosted Checkout Status
Google Pay is not always available for your consumer, depending on what browser, device or settings they are using. Because of this, it might be possible that your consumer is not able to complete the payment, for example when the Hosted Checkout session is restricted to only the Google Pay payment product. In this (rare) case we will detect this and update the Hosted Checkout Status to CLIENT_NOT_ELIGIBLE_FOR_SELECTED_PAYMENT_PRODUCT. You are advised to encourage your customer to select a different payment product when you receive this status. In order to prevent this scenario you could perform an isReadyToPay check yourself before creating a Hosted Checkout session with only Google Pay available. Please see Google‘s documentation for more information on how you should do this. When there are other products available in the Hosted Checkout session we do not update to the CLIENT_NOT_ELIGIBLE_FOR_SELECTED_PAYMENT_PRODUCT status, but advise your consumer to select a different product.
Google Pay in an iframe
You can show Google Pay in an iframe. It's recommended to validate whether the consumer can pay with Google Pay with the device and browser the consumer uses.
The following is an example of an iframe on your website, to allow Google Pay to appear by setting the allowPaymentRequest which is used by Google Pay. You can find more information about this allowPaymentRequest here.
<iframe width="400" height="300" src="https://www.example.com/checkout" allowpaymentrequest="" title="Checkout page"></iframe>Customize the button
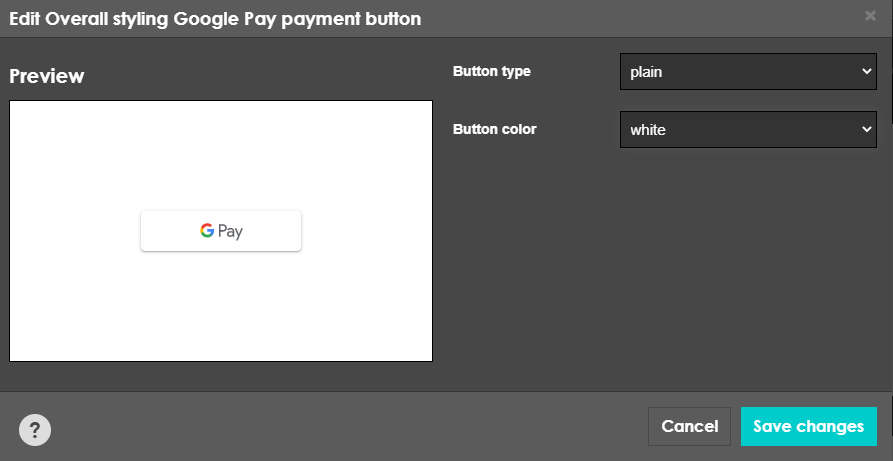
The Google Pay button on the MyCheckout hosted payment pages can be customized in the MyCheckout Editor. You can access the MyCheckout Editor by logging into the configuration center. Select the right merchant and then go to "Look & feel" underneath the Hosted payment pages menu. The MyCheckout Editor will open and allow you to customize the MyCheckout hosted payment pages. Select Overall styling in the side menu and click on Google Pay Payment Buggon. You can choose the following three button types:
- Plain
- Buy
- Donate
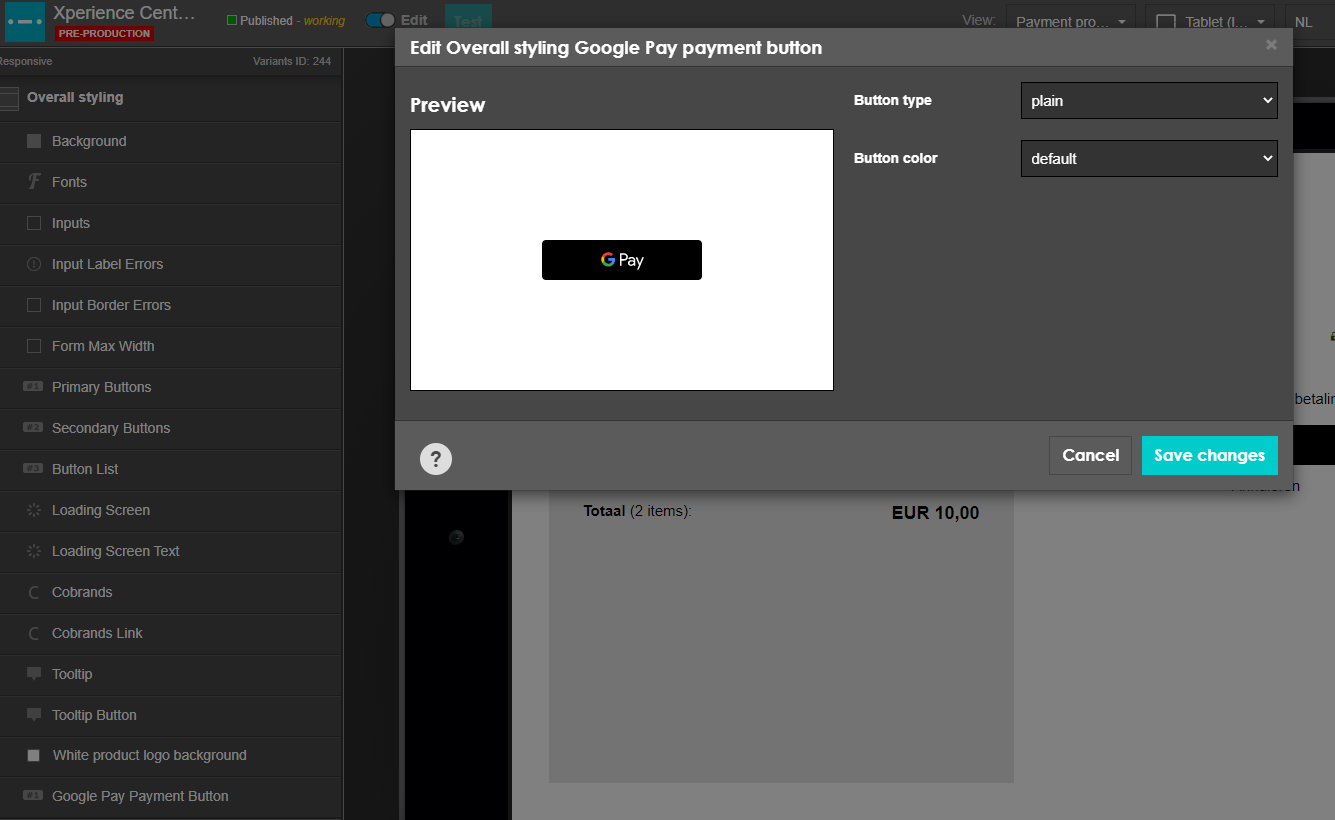
Next to that, you can select the following button colors:
- Default
- Black
- White
Google Pay response containing a regular card number
In case your consumer pays with a card stored in their Google Account (PAN_ONLY), the transaction will be processed as a regular card transation. Below you see an example response, where you will notice you get a card payment product response returned.
   {
  "createdPaymentOutput": {
    "payment": {
      "id": "000000999110099313510000100001",
      "hostedCheckoutSpecificOutput": {
        "hostedCheckoutId": "06283c21-1234-71ff-82db-3511e267567b",
        "variant": "217"
      },
      "paymentOutput": {
        "amountOfMoney": {
          "amount": 100,
          "currencyCode": "EUR",
          "references": {
            "paymentReference": "0",
            "providerId": "3200"
          },
          "paymentMethod": "card",
          "cardPaymentMethodSpecificOutput": {
            "paymentProductId": 3,
            "fraudResults": {
              "fraudServiceResult": "accepted",
              "inAuth": {
                "deviceCategory": "PERSONAL_COMPUTER",
                "deviceId": "6b9bedd6-d267-4c55-96e1-39e9006c1de3",
                "riskScore": "20",
                "trueIpAddress": "185.139.247.226",
                "trueIpAddressCountry": "netherlands"
              },
              "avsResult": "0",
              "cvvResult": "0",
              "retailDecisions": {
                "fraudCode": "0100",
                "fraudNeural": "30"
              }
            },
            "threeDSecureResults": {
              "authenticationAmount": {
                "amount": 100,
                "currencyCode": "EUR"
              },
              "eci": "0",
              "exemptionOutput": {
                "exemptionRaised": "none",
                "exemptionRequest": "none"
              }
            },
            "card": {
              "cardNumber": "****************",
              "expiryDate": "****"
            },
            "initialSchemeTransactionId": "30",
            "schemeTransactionId": "30"
          }
        },
        "status": "CAPTURE_REQUESTED",
        "statusOutput": {
          "isCancellable": true,
          "statusCategory": "PENDING_CONNECT_OR_3RD_PARTY",
          "statusCode": 800,
          "statusCodeChangeDateTime": "20220517174220",
          "isAuthorized": true,
          "isRefundable": false
        }
      }
    },
    "paymentCreationReferences": {
      "additionalReference": "00000099911009931351",
      "externalReference": "000000999110099313510000100001"
    },
    "paymentStatusCategory": "SUCCESSFUL"
  },
  "status": "PAYMENT_CREATED"
}