JavaScript SDK and example application
Introduction
To understand how to use this SDK it is best to read the following documentation:
- Mobile Introduction
First read the Mobile Introduction to familiarize yourself with the various concepts. Even though the JavaScript SDK is not used for developing native mobile apps, the concepts that are used are very much the same as in the iOS and Android SDKs - Client API Reference
The JavaScript SDK wraps the Client API and (amongst other things) exposes the responses of the webservice calls as JavaScript objects. Understanding the Client API will help you understanding these SDK objects as well. - JavaScript APi on Github
The JavaScript SDK github repository contains a working example application which can help you understand how the SDK is best used. - This current document will help you understand the global flow when creating payment pages using the JavaScript SDK.
-
JavaScript
Our JavaScript SDK supports ECMAScript 3 and up out-of-the box. No external dependencies.

The JavaScript SDK helps you to communicate with the Client API by offering the following:
- encryption handling for payment details
- JavaScript wrappers for API responses
- localization of labels and message
- input validation
- user-friendly formatting of payment data (card numbers and expiry dates)
- identified payment provider for a given card number
Its use is demonstrated by an example app, constructing UI elements for the payment process from API responses. The SDK source code and the example app are available on Github .
The API documentation of the latest SDK version is available here . For a specific version, replace "latest" with the actual version. Note that this is only available for versions 4.0.0 and later.
Main payment steps
- Initialize the JavaScript SDK for the payment.
- Retrieve payment products, accounts on file, and tokens. Your app uses this data to create the payment product selection page.
- Retrieve all the details about the payment product fields from the Client API that the customer needs to provide based on the selected payment product or account on file. Your app uses this data to create the payment product details page.
- Encrypt all the provided payment information using the Client API. Your app sends the encrypted result to your backend server, which then sends it to Server API in the create payment request. Note: Create payment request call can only be performed via Server API.
- Based on the Server API response, direct the customer to the next payment step. It can be a "payment successful" or "payment failed" screen or a third-party redirect that completes the payment.
Initialize the JavaScript SDK for the payment
Initialize the JavaScript SDK with necessary authentication and context information for performing Client API calls. All the required data can be obtained with the Create session request from your web server using Server SDKs or Server API.
Then you need to pass the following information in your Client SDK:
- clientSessionId - client session identifier needed for authentication
- customerId - customer identifier needed for authentication
- clientApiUrl - datacenter-specific base URL for client API requests
- assetUrl - a datacenter-specific base URL for assets (such as logos) used by the SDK
Retrieve the payment items and accounts on file
The next step is to get information (ID, logo, localized name) on the relevant payment products. To retrieve information specifically about the payment products you're interested in, you can use the Client SDK to make a GET Payment Product or GET Payment Product Groups call. Provide the required information for the query:
- Payment amount
- Payer's country
- Desired locale for response texts (may differ per country)
- Currency to be used
- Payment type (single or recurring)
For some payment products, customers can indicate that they want our platform to store part of the data they enter while using selected payment products (for example, the cardholder name and the card number for certain card-based products).
The stored data is referred to as an account on file. When a customer wants to use the same payment product for another payment, it's possible to select one of the stored accounts on file. In such cases, the customer doesn't have to enter the information again. The list of available payment products the SDK receives from the Client API also contains the accounts on file for each payment product. Your app can present this list of payment products and accounts on file to the customer.
After getting information on the relevant payment products, you can build a payment product selection page. Payment products are either instances of BasicPaymentProduct or BasicPaymentProductGroup. Note that:
- Conveniently, the SDK provides an example app to help with your implementation.
- If you only have one payment item, you can, of course, skip the selection page. However, you might also want to display the accounts on file and token selection.
- You can freely use our example app without changing anything.
Retrieve all the details about the payment product fields
Once the customer selects a payment item or a stored account on file, the SDK can request which information needs to be provided by the customer to perform a payment.
If a request for a single payment item (product or product group) is made, the SDK lists all the fields that should be rendered, including:
- display hints (type of input field)
- validation rules
If the customer selects an account on file, the SDK provides the stored information so you can prefill input fields (for example, masked card number, cardholder name, etc.)
Again, the example app can be the starting point to create your page. If no additional information is required to be entered, this page can be skipped.
Encrypt all the provided payment information
The JavaScript SDK can be used to encrypt a cardholder's sensitive data and then create a payment through these steps:
- Consumer enters all required data in the payment details page.
- JavaScript SDK encrypts the sensitive data using the PublicKey in an encrypted BLOB containing the following items:
- clientSessionId
- nonce (Universal Unique Identifier generated by the Client)
- paymentProductId
- paymentValues (an array of keys/value pairs)
- You need to send the encryptedString to your web server.
This step can only be implemented by you and it's not part of any of our SDKs, as the communication between your website/app and your web server is built by you.
- You can request a payment using a POST to the /payments endpoint using one of our Server SDKs. It's not part of any of our Client SDKs, thus not for JavaScript SDK.
Use the response from the Server API call
It's up to you and your application to show the customer the correct screens based on the response of the Server API call. In some cases, the payment hasn't finished just yet as the customer must be redirected to a third party (such as a bank or PayPal) to do the actual payment. See the Server API documentation on what kinds of responses the Server API can provide. The Client API has no part in the remainder of the payment.
Components of the JavaScript SDK
connectsdk
When you include the SDK it will automatically add exactly one object to the global namespace: connectsdk. All other functionality of the JavaScript SDK is accessible via this object.
Session
The JavaScript SDK doesn't do anything without a valid session on the Worldline servers. Once such a session is established using the Server API, the JavaScript SDK can communicate with the Client API as long as it provides the session credentials. As explained above, a client session identifier, customer identifier, client-api-url and asset-base-url are required to communicate with the Client API. The session instance is the primary object that you will use. All other objects are available through it. The following code fragment shows how Session is initialized. The documentation of the Server SDKs and the Server API describes how to obtain a client session identifier, customer identifier and the two api connectors.
// Note: a successful response from Create Session can be used directly as input
var session = new connectsdk.Session({
    clientSessionId : "47e9dc332ca24273818be2a46072e006",
    customerId : "9991-0d93d6a0e18443bd871c89ec6d38a873",
    clientApiUrl : "https://clientapi.com",
    assetUrl : "https://asset.com"
});
BasicPaymentItems
Via the session object you can request an object called BasicPaymentItems which contains all BasicPaymentItems that you can use in the context of this session and payment details. Besides this it also contains a list of all AccountOnFile objects that are associated with the current user. The code fragment below shows how to get the BasicPaymentItems instance.
When you call the Client API yourself without using the JavaScript SDK you'd see the server simply returns JSON. The SDK maps this JSON response to JavaScript objects and adds convenience functions to them as well. If you just want the raw JSON without all the extra SDK stuff then you can always get that via the json field of those objects. This not only holds for the BasicPaymentItems object, but for all other objects that are wrappers around the raw Client API JSON responses. Each such JavaScript object contains the json of it and of all its child objects.
As described above the payment information can influence which payment products are available. That is why we need to provide the current payment information when doing this call.
The getPaymentProducts function call is asynchronous. Instead of working with callbacks the SDK uses promises . This hold for all asynchronous calls.
The JavaScript SDK offers localized labels for all entities it requests via the Client API. This is done by setting the "locale" field of the paymentDetails object to the correct value when doing a getPaymentProducts call. Changing to a different language is as simple as changing this value and doing the call again. The available locales can be found (and extended) in the language pack functionality of the configuration center.
// We assume we already have a Session stored in the variable "session".
// See Session how to create such an instance.

var paymentDetails = { "totalAmount" : 16195, // in cents
    "countryCode" : "NL",
    "locale" : "nl_NL", // as specified in the config center
    "isRecurring" : false, // set if recurring
    "currency" : "EUR" // set currency, see dropdown
    };

session.getBasicPaymentItems(paymentDetails, true).then(function (basicPaymentItems) {
    // The promise has fulfilled, basicPaymentItems is an instance of BasicPaymentItems

    // this is an array of BasicPaymentproduct objects
    basicPaymentItems.basicPaymentItems;

    // this is an array of AccountOnFile objects
    basicPaymentItems.accountsOnFile;

    // This returns the Visa BasicPaymentProduct object in this PaymentProducts object if it exists.
    var paymentProduct = basicPaymentItems.paymentProductById["1"];

    // The raw JSON that the server returned and that was used to fill this object
    basicPaymentItems.json;

}, function() {
    // The promise failed, inform the user what happened.
    ...
});
BasicPaymentProduct
The SDK offers two classes to represent information about payment products: BasicPaymentProduct and its subclass PaymentProduct. Practically speaking, instances of BasicPaymentProduct contain only the information that is required to create a simple list of payment products from which the user can select one. The class PaymentProduct contains additional information such as the individual form fields that the user needs to fill out and is typically used when creating a detail page of that payment product. The reason we have two instead of one payment product type is performance. A list of BasicPaymentProduct takes up less bandwidth and server time than a list of PaymentProduct objects.
In the code fragment below, the id, label and logo for a payment product are retrieved. Remember that the language that is used for textual fields depends on the locale that was set when retrieving the PaymentProducts object.
// We assume we already have a PaymentProducts object stored in the variable "paymentProducts".
// See the PaymentProducts component how to create such an instance.

// This gives the id, name (label) and URL of the logo of payment product 1
var basicPaymentProduct = paymentProducts.paymentProductById["1"];
basicPaymentProduct.id;                  // 1
basicPaymentProduct.displayHints.label;  // VISA
basicPaymentProduct.displayHints.logo;   // http://www.domain.com/path/to/visa/logo.gif
basicPaymentProduct.accountOnFileById["123"].displayText;   // 1234 **** **** 1234
BasicPaymentProductGroup
The SDK offers two classes to represent information about payment groups: BasicPaymentProductGroup and its subclass PaymentProductGroup. Practically speaking, instances of BasicPaymentProductGroup contain only the information that is required to create a simple list of payment products from which the user can select one. The class PaymentProductGroup contains additional information such as the individual form fields that the user needs to fill out and is typically used when creating a detail page of that payment product. The reason we have two instead of one payment product type is performance. A list of BasicPaymentProductGroup takes up less bandwidth and server time than a list of PaymentProductGroup objects.
In the code fragment below, the id, label and logo for a payment product group are retrieved. Remember that the language that is used for textual fields depends on the locale that was set when retrieving the PaymentProductGroups object.
// We assume we already have a BasicPaymentProductGroups object stored in the variable "basicPaymentProductGroups".
// See the BasicPaymentProductGroups component how to create such an instance.

// This gives the id, name (label) and URL of the logo of payment product group 'cards'
var basicPaymentProductGroup = basicPaymentProductGroups.basicPaymentProductGroupById["cards"];
basicPaymentProduct.id;                  // 'cards'
basicPaymentProduct.displayHints.label;  // cards
basicPaymentProduct.displayHints.logo;   // http://www.domain.com/path/to/cards/logo.gif
AccountOnFile
An instance of AccountOnFile represents information about an account on file for a certain payment product for the current user. The code fragment below shows how the label for an account on file can be retrieved. This label can be shown to the customer, along with the logo of the corresponding payment product, to enable the user to distinguish one account on file from another.
// We assume we already have a PaymentProducts object stored in the variable "paymentProducts".
// See the PaymentProducts component how to create such an instance.

// This contains all accounts on file for all paymentproducts.
paymentProducts.accountsOnFile;

// This contains all accounts on file for payment product VISA
var aof = paymentProducts.paymentProductById["1"].accountsOnFile;

// This shows a mask based nicely formatted value for that obfuscated cardNumber. The mask that
// is used is defined in the displayHints of this account on file.
// If the mask was {{9999}} {{9999}} {{9999}} {{9999}} {{999}} then the result would be
// **** **** **** 7412
aof.getMaskedValueByAttributeKey("cardNumber");
PaymentProduct & PaymentProductGroup
As explained above, BasicPaymentProduct and BasicPaymentProductGroup only contains the information required by a customer to distinguish one payment product from another. However, once a payment item or an account on file has been selected, the customer must provide additional information, such as a bank account number, a credit card number, or an expiry date, before a payment can be processed. Each payment item can have a number of fields that need to be completed to process a payment. Instances of BasicPaymentProduct and BasicPaymentProductGroup do not contain any information about these fields.
Information about the fields of payment products is represented by instances of PaymentProductField, which are contained in instances of PaymentProduct and PaymentProductGroup. The class PaymentProductField is described below. The session component can be used to retrieve instances of PaymentProduct, as shown in the following code fragment.
// We assume we already have a Session stored in the variable "session".
// See Session how to create such an instance.

var paymentDetails = { "totalAmount" : 16195, // in cents
    "countryCode" : "NL",
    "locale" : "nl_NL", // as specified in the config center
    "isRecurring" : false, // set if recurring
    "currency" : "EUR" // set currency, see dropdown
};

session.getPaymentProduct("1", paymentDetails).then(function(paymentProduct) {
    // The promise has fulfilled, paymentProduct is an instance of PaymentProduct

    // this is an array of all the fields the user still needs to fill out
    paymentProduct.paymentProductFields;

    // this returns the PaymentProductField object with the given id
    paymentProduct.paymentProductFieldById["cvv"];

    // The raw JSON that the server returned and that was used to fill this object
    paymentProduct.json;

}, function() {
    // The promise failed, inform the user what happened.
    ...
});
Instances of PaymentProducGroup can be retrived as shown in the fragment below.
// We assume we already have a Session stored in the variable "session".
// See Session how to create such an instance.

var paymentDetails = { "totalAmount" : 16195, // in cents
    "countryCode" : "NL",
    "locale" : "nl_NL", // as specified in the config center
    "isRecurring" : false, // set if recurring
    "currency" : "EUR" // set currency, see dropdown
};

session.getPaymentProductGroup("cards", paymentDetails).then(function(paymentProductGroup) {
    // The promise has fulfilled, paymentProductGroup is an instance of PaymentProductGroup

    // this is an array of all the fields the user still needs to fill out
    paymentProductGroup.paymentProductFields;

    // this returns the PaymentProductField object with the given id
    paymentProductGroup.paymentProductFieldById["cvv"];

    // The raw JSON that the server returned and that was used to fill this object
    paymentProductGroup.json;

}, function() {
    // The promise failed, inform the user what happened.
    ...
});
PaymentProductField
The fields of payment products are represented by instances of PaymentProductField. Each field has an identifier, a type, a definition of restrictions that apply to the value of the field, and information about how the field should be presented graphically to the customer. Additionally, an instance of a field can be used to determine whether a given value is a valid value for the field.
In the code fragment below, the field with identifier “cvv” is retrieved from a payment product. The data restrictions of the field are inspected to see whether this field is a required field or an optional field. Additionally, the display hints of the field are inspected to see whether the values a customer provides should be obfuscated in a user interface.
// We assume we already have a payment product stored in the variable "paymentProduct".
// See PaymentProduct for how to create such an instance.

var cvvField = paymentProduct.paymentProductFieldById["cvv"];
cvvField.dataRestrictions.isRequired
cvvField.displayHints.obfuscate
PaymentRequest
Once a payment product has been selected and an instance of PaymentProduct has been retrieved, a payment request can be constructed. This class is a container for all the values the customer provided. You should store all answers in this object. When the user has finished filling out the forms then this object can be given to Encryptor so it can encrypt its content. PaymentProduct has a property tokenize, which is used to indicate whether a payment request should be stored as an account on file. The code fragment below shows how a payment request should be constructed when the request should not be stored as an account on file.
// We assume we already have a Session stored in the variable "session".
// See Session how to create such an instance.

var paymentRequest = session.getPaymentRequest();  // This will return the same instance of PaymentRequest every time.
paymentRequest.setPaymentProduct(paymentProduct);  // paymentProduct is an instance of the PaymentProduct class
paymentRequest.setTokenize(false);
If the customer selected an account on file, both the account on file and the corresponding payment product must be supplied while constructing the payment request, as shown below. Instances of AccountOnFile can be retrieved from instances of BasicPaymentProduct and PaymentProduct.
var paymentRequest = session.getPaymentRequest();  // This will return the same instance of PaymentRequest every time.
paymentRequest.setPaymentProduct(paymentProduct);  // paymentProduct is an instance of the PaymentProduct class (not BasicPaymentProduct)
paymentRequest.setAccountOnFile(accountOnFile);    // accountOnFile is an instance of the AccountOnFile class
paymentRequest.setTokenize(false);
Once a payment request has been configured, the values for the payment product's fields can be supplied as follows. The identifiers of the fields, such as “cardNumber” and “cvv” in the example below, are used to set the values of the fields using the payment request.
var paymentRequest = session.getPaymentRequest();  // This will return the same instance of PaymentRequest every time.
paymentRequest.setValue("cardNumber", "1245 1254 4575 45"); // This should be the masked value.
paymentRequest.setValue("cvv", "123");
Once all values have been supplied, the payment request can be validated, as shown below. Behind the scenes the validation uses the DataRestrictions object for each of the fields that were added to the PaymentRequest. After validation, a list of errors is available, which indicates the problems that occurred during validation. If there are no errors, the payment request can be encrypted and sent to the Worldline platform via your e-commerce server. If there are validation errors, the customer should be provided with feedback about these errors as explained above.
if (!paymentRequest.isValid()) {
	// We have validation errors.
	paymentRequest.getErrorMessageIds(); //This is an array of all the validation errors
	...
} else {
	// All fine, encrypt!
	...
}
Encryptor
When the PaymentRequest has been filled with the selected payment product, the payment product fields that were requested, potentially the selected account on file info and tokenization info, we can encrypt it. For this the SDK offers an Encryptor object. Encryption is straightforward:
var encryptor = session.getEncryptor();

// Encrypting is an async task that we provide you as a promise.
encryptor.encrypt(paymentRequest).then(function(encryptedString) {
  // The promise has fulfilled. The encryptedString contains the ciphertext
  // that should be sent to the Worldline platform via the Server API
  ...

}, function(errors) {
	// The promise failed, inform the user what happened.
	...
});
When the encryptor runs, the PaymentRequest is first validated for potential issues with the data. This makes sure we're not spending time encrypting invalid data that the Worldline platform will not be able to process in the Server API. The validations are the PaymentProductFieldValidators linked to the PaymentProductFields and are returned as value.
The encryptor wraps JOSEEncryptor. It is possible to use JOSEEncryptor directly but you will miss the helper functionality that Encryptor offers. If you want to use JOSEEncryptor directly you will have to provide the data in the following JSON:
{
  "clientSessionId": "9991-89034758982340982334234234",
  "nonce": "067e6162-3b6f-4ae2-a171-2470b63dff00",
  "paymentProductId": 1,
  "accountOnFileId": 3,
  "tokenize": true,
  "paymentValues": [
    {
      "key": "cvv",
      "value": "159"
    },
    {
      "key": "expiryDate",
      "value": "1115"
    },
    {
      "key": "cardNumber",
      "value": "4242424242424242"
    }
  ]
}Issuer identification number check
The first six digits of a payment card number are known as the Issuer Identification Number (IIN). An instance of Session can be used to check which payment product is associated with an IIN. The result of this check is an instance of IINDetailsResponse. This class has a property status that indicates the result of the check and a property paymentProductId that indicates which payment product is associated with the IIN. The property status can have a number of values.
- The value SUPPORTED indicates that the IIN is associated with a payment product that is supported by the Worldline platform.
- The value UNSUPPORTED indicates that the IIN is associated with an unsupported payment product.
- The value UNKNOWN indicates that the IIN is not recognized.
- The value NOT_ENOUGH_DIGITS indicates that fewer than six digits have been provided.
The code fragment below shows how an instance of IINDetailsResponse can be obtained.
var paymentDetails = { "totalAmount" : 16195, // in cents
    "countryCode" : "NL",
    "locale" : "nl_NL", // as specified in the config center
    "isRecurring" : false, // set if recurring
    "currency" : "EUR" // set currency, see dropdown
};

var firstSixDigitsOfCreditcardNumber = "123456";
session.getIinDetails(firstSixDigitsOfCreditcardNumber, paymentDetails).then(function(iinDetailsResponse) {
  // The promise has fulfilled.

  iinDetailsResponse.status
  iinDetailsResponse.paymentProductId

}, function(errors) {
	// The promise failed, inform the user what happened.
	...
});
MaskingUtil
To help in formatting field values based on masks the SDk offers the MaskingUtil class. It allows you to apply and unapply masks on string. Below you see some examples
var maskingUtil = new connectsdk.MaskingUtil();
var mask = "{{9999}} {{9999}} {{9999}} {{9999}} {{999}}";
var unmaskedString = "1234567890123456"
var result = maskingUtil.applyMask(mask, unmaskedString);
result.getFormattedValue(); // contains "1234 5678 9012 3456"

var maskedString = "1234 5678 9012 3456";
maskingUtil.removeMask(mask, maskedString); // contains "1234567890123456"
Converting amounts
To help converting amounts from one currency to another the SDK offers the convertAmount method on the Session object. This method takes an amount in cents, and a source and target currency which are both three-letter ISO currency codes. It returns a promise that returns a simple JSON object when it is fulfilled.
// We assume we already have a Session stored in the variable "session".
// See Session how to create such an instance.

// This will convert 1500 USD to the equivalent value in EUR
session.convertAmount(1500, "USD", "EUR").then(function(json) {
    // The promise has fulfilled and returns a JSON object

    // The JSON contains one field named 'convertedAmount'.
    json.convertedAmount  // at the time of writing this returns the value 1085
}, function() {
    // The promise failed, inform the user what happened.
    ...
});
Retrieving a payment product directory
Certain payment products have directories that the consumer needs to pick from. An example is the list of banks for the Dutch iDeal payment product that the consumer needs to select their bank from. If you are looking to get all details on all payment products including the entries of possible directories we encourage you to use the session.getPaymentProducts method. If you however only want to retrieve the directory information you can use the session.getPaymentProductDirectory method.
This method takes a payment product id, a three-letter ISO currency code and an ISO 3166-1 alpha-2 country code and returns a promise that returns a JSON object of all the entries when it fulfills. See the C2S API documentation to see what is included in this JSON object.
// We assume we already have a Session stored in the variable "session".
// See Session how to create such an instance.

session.getPaymentProductDirectory(809, "EUR", "NL").then(function(json) {
    // The promise has fulfilled and returns a JSON object

    // The json contains an "entries" field whos value is a list of entries
    // that each describe a possible directory value.
    json.entries.forEach(function(entry) {
        console.log(entry);
    });
}, function() {
    // The promise failed, inform the user what happened.
    ...
});
Example application
The example application illustrates the possibilities of the JavaScript SDK and the services offered by Worldline. Its source code is available on Github . The example application consists of four screens:
- The first screen asks for the information necessary to communicate with the Client API and retrieve a list of payment products. This screen should not be part of an actual application in the application store. It is provided to illustrate which information is needed to initialize an instance of Session.
- The second screen is a dynamically generated payment product selection screen. Based on the input provided in the first screen, a list of available payment products and previously stored accounts on file is shown. This screen or a similar screen would typically be part of an actual application. It is described in more detail below.
- After selecting a payment product, the third screen is shown. This screen requests the information needed to complete the payment for the selected payment product. The provided information can only be submitted by the customer if it has been validated by the SDK. Also this screen or a similar screen would be part of an actual application and is described in further detail below.
- The fourth screen indicates that the initiated payment has been successfully processed by the SDK. This screen should not be part of an actual application.
Payment product selection screen
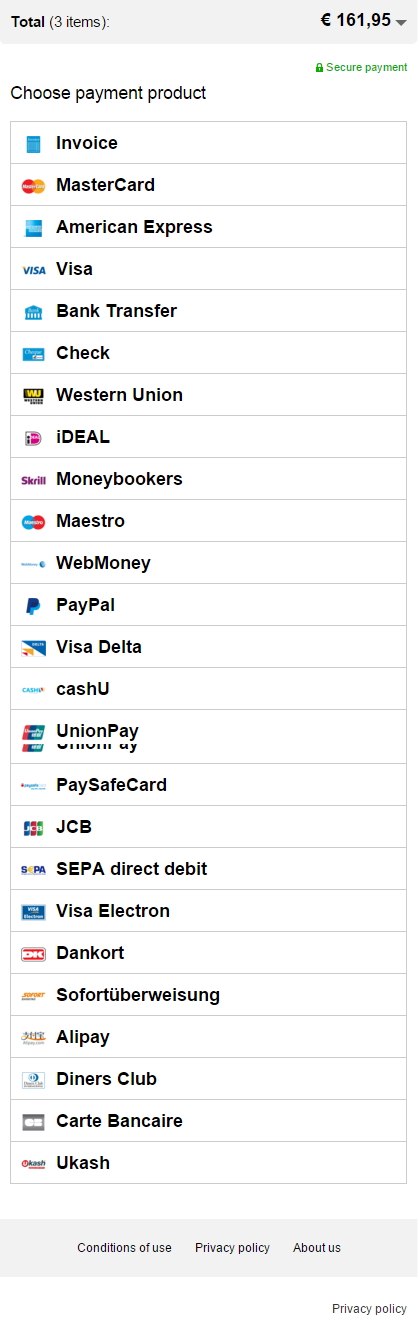
The payment product selection screen provides an example for one of the two screens that will appear in most apps that use the JavaScript SDK. It shows a list of available payment items and accounts on file. For each payment item, a localized name is shown, and for each account on file, a short description of the stored information is shown. If a logo is available for a payment item, this logo is also shown. The screenshot to the left shows the payment product selection screen. It contains a part of a list of available payment items, generated from the information contained in an instance of BasicPaymentItems.
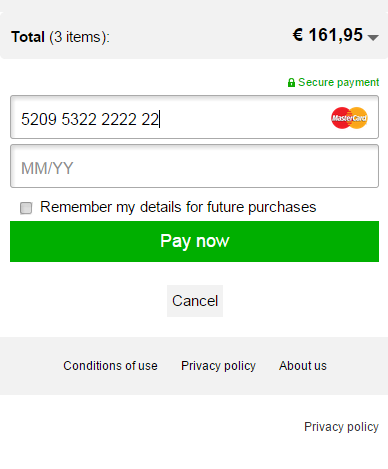
Payment product input form screen
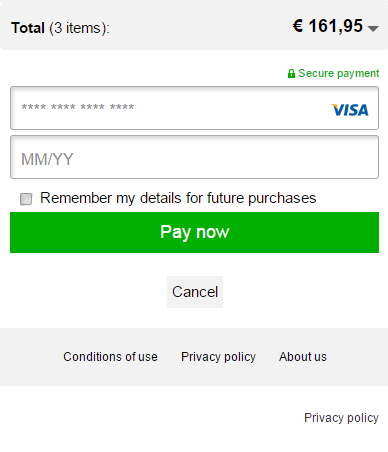
The screen that shows the input activity for a selected payment item or account on file is another example of a screen that will appear in most apps that use the JavaScript SDK. It is shown after selecting a payment item or an account on file. If the customer has selected an account on file, some of the required values will already be filled in and cannot be changed. The screenshot to the left shows the payment item input screen. The input form is generated from an instance of PaymentProduct or PaymentProductGroup.
Form validation
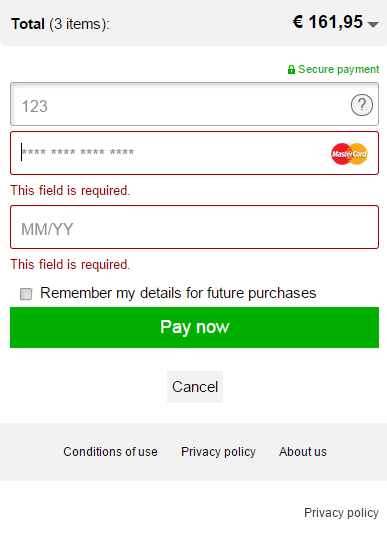
The example app uses the SDK to validate the input provided by the customer when the pay button is pressed. If the provided data is invalid, error messages are shown below the invalid values. The screenshot to the left shows the payment product input form screen after validation.
Additional information
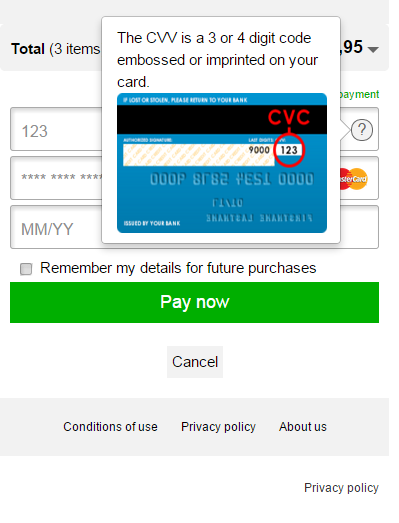
Some payment product fields might require some additional explanation. The information button next to the text field for the CVV code shown below indicates that additional information is available. The image shown when the customer presses the button is part of the display hints of the payment product field. The textual explanation is a localized string that is part of the SDK. The screenshot to the left shows the payment product input activity screen after pressing the information button.
IIN check
The example application also demonstrates the use of the IIN check described above. For each of the card-based payment products, an IIN check is performed once the customer has entered six or more digits in the text field for the card number. If the IIN is associated to the selected payment product, the logo of this payment product appears on the right-hand side of the text field. If the IIN is associated to another payment product, the input fields are replaced with the input fields for the new payment product automatically. The IIN check can also be used to switch from a PaymentProductGroup to a specific PaymentProduct.
The screenshot to the left also shows how the co-brands that may be associated to a certain card may be rendered. The payment product logo and name of the co-brands are retrieved by doing specific calls for them.