Swift SDK and example app
Introduction
To understand how to use this SDK it is best to read the following documentation:
- Mobile Introduction
First read the Mobile Introduction to familiarize yourself with the various concepts. - Client API Reference
The Swift SDK wraps the Client API and (amongst other things) exposes the responses of the webservice calls as Swift objects. Understanding the Client API will help you understanding these SDK objects as well. - Swift SDK on GitHub
The Swift SDK has a working example application which can help you understand how the SDK is best used. - This current document will help you understand the global flow when creating payment pages using the Swift SDK.
The native SDK for Swift helps you to communicate with the Client API. It offers
- convenient Swift wrappers for API responses,
- caching of payment product logos and caching of images used to offer additional information about payment products,
- localization of various labels and messages,
- user-friendly formatting of payment data such as card numbers and expiry dates,
- validation of input,
- a check to determine to which payment provider a card number is associated, and
- handling of all the details concerning the encryption of payment details.
Its use is demonstrated by an example app, which constructs the user interface elements used throughout the payment process from API responses on the fly. The source code of the SDK and the example app are available on GitHub . There you can find installation instructions.
The main payment steps
Setting up and completing a payment using the Swift SDK is done in a number of steps:
- Initialize the Swift SDK for this payment. This is done using information such as session and customer identifiers, geographical information and payment information like currency and total amount.
- Retrieve the payment items and accounts on file that can be used for this payment from the Client API. Your app uses this data to create the payment product selection screen.
- Retrieve all the details about the payment product fields from the Client API that the customer needs to provide based on the selected payment product or account on file. Your app uses this information to create the payment product details screen.
- Encrypt all the provided payment information using the Client API. Your app sends the encrypted result to your e-commerce server, which sends it to our Server API.
- Use the response from the Server API call to guide the customer to the next step in the payment process. This can be a simple "payment successful" or "payment failed" screen or a redirect to a third party that completes the payment.
These steps are explained in more detail in the next couple of paragraphs.
Initialize the Swift SDK for this payment
By initializing the Swift SDK, you provide the SDK with all the information it needs to authenticate to the Client API and to make sure the Client API calls have all the context they need to return the correct data. It needs the following information:
- A client session identifier and a customer identifier, which the Client API needs for authentication purposes. These can be obtained by your e-commerce server using the Server SDKs or directly using the Server API.
- The client-api-url and asset-url that the SDK should connect to. The SDK communicates with two types of servers to perform its tasks. One type of server offers the Client API discussed above, and the other type of server stores the static resources used by the SDK, such as the logos of payment products. The urls of these servers can be obtained by your e-commerce server using the Server SDKs or directly using the Server API.
- The type of environment you want to connect to. This is either production, pre-production or our sandbox.
- Payment information. The payment products that the customer can choose from depends on payment information so the Client SDK needs this information to be able to do its job. What it needs is:
- the total amount of the payment,
- the country of the person that is performing the payment,
- the currency that should be used, and
- whether the payment is a single payment or a recurring payment.
Related SDK components are: Session and PaymentContext
Retrieve the payment items and accounts on file
After initialization, the Swift SDK offers easy access to all the payment items that can be used for this payment method. Payment items are either instances of BasicPaymentProduct or BasicPaymentProductGroup. Your app can use these items to create a screen that lists them all. For your convenience, the SDK comes with an example app that you can use as a basis for your own implementation. If you are fine with the look-and-feel of the example app, you do not need to make any changes at all. If you only have one payment item, you can of course skip this screen, but remember that you might also want to display the account(s) on file selection.
For some payment products, customers can indicate that they want the Worldline platform to store part of the data they enter while using such a payment product. For example, it is possible to store the card holder name and the card number for certain card-based payment products. The stored data is referred to as an account on file. When the customer wants to use the same payment product for another payment, it is possible to select one of the stored accounts on file for this payment. In such cases, the customer doesn't have to enter the information that is already stored in the account on file. The list of available payment items that the SDK receives from the Client API also contains the accounts on file for each payment product or payment product group. Your app can present this list of payment items and accounts on file to the customer.
Related SDK components are: PaymentItems, BasicPaymentProduct, BasicPaymentProductGroup, AccountsOnFile and AccountOnFile
Retrieve all the details about the payment product fields
Once the customer has selected a payment item or a stored account on file, the SDK can request which information needs to be provided by the customer to perform a payment. If a request for a single payment item (product or product group) is being done, the SDK provides a list of all the fields that should be rendered including display hints and validation rules. If the customer selected an account on file, information that is already in this account on file can be prefilled in the input fields, instead of requesting it from the customer. Again, the example app can be used as the starting point to create your screen. If there is no additional information that needs to be entered, this screen can of course be skipped.
Related SDK components are: PaymentProduct, PaymentProductGroup, PaymentProductField, ValidationError and Issuer identification number check
Encrypt all the provided payment information
Finally, the SDK can encrypt the information provided by the customer in a format that can be processed by the Server API. In most cases, your app will send this encrypted information to your e-commerce server, which in turn sends it to our servers using the Server API. All the heavy lifting, such as requesting a public key from the Client API, performing the encryption and BASE-64 encoding the result into one string, is done for you by the SDK. You only need to provide the SDK with the values the customer provided in your screens. The encrypted package needs to be sent to your e-commerce server where it can be forwarded to the Server API. The Swift SDK does not do this for you as it does not know how your app communicates with your own server.
Related SDK components are: PaymentRequest and PreparedPaymentRequest
Use the response from the Server API call
It's up to you and your app to show the customer the correct screens based on the response of the Server API call. In some cases, the payment hasn't finished just yet as the customer must be redirected to a third party (such as a bank or PayPal) to do the actual payment. See the Server API documentation on what kind of responses the Server API can provide. The Client API has no part in the remainder of the payment.
Components of the Swift SDK
Session
The class Session is the main component of the SDK. Once configured, instances of this class can communicate with the Client API and convert the responses of the API into plain Swift objects. Additionally, they can encrypt Swift objects describing payment requests to a form that can be processed by the Server API. The following code fragment shows how Session is initialized. As explained above, a client session identifier, customer identifier, client-api-url, asset-base-url and application identifier are required to communicate with the Client API. The documentation of the Server SDKs and the Server API describes how to obtain a client session identifier, customer identifier and the two api connectors.
let clientSessionId = "1234"
let customerId = "5678"
let baseURL = "https://clientapi.com"
let assetBaseURL = "https://asset.com"
let appIdentifier = "Example Application/v1"

var session = Session(clientSessionId: clientSessionId, customerId: customerId,
                            baseURL: baseURL, assetBaseURL: assetBaseURL, appIdentifier: appIdentifier)
PaymentContext
Instances of the class PaymentContext contain the information needed to request a list of available payment products: a total amount, a country code, a currency code, and an indication of whether the payment is a single payment or a recurring payment. The code fragment below shows how an instance of this class is initialized and used to retrieve such a list.
let amountValue = 100
let countryCode = "NL"
let currencyCode = "EUR"
let isRecurring = false

// Indicate whether we want an PaymentItems object that includes groups,
// or just contains basic payment products
let groupPaymentProducts = true
let amountOfMoney = PaymentAmountOfMoney(totalAmount: amountValue, currencyCode: currencyCode)
let context = PaymentContext(amountOfMoney: amountOfMoney, isRecurring: isRecurring,
                            countryCode: countryCode)

session.paymentItems(for: context, groupPaymentProducts: groupPaymentProducts,
                            success: { paymentItems in
    // Allow the customer to select a payment item and an optional
    // account on file from the list of payment items
    // represented by paymentItems.
}, failure: { error in
    // Indicate that an error has occurred.
})
BasicPaymentItems
Instances of PaymentProducts contain a list of instances of AccountOnFile, and another list of instances of BasicPaymentItem. Currently a BasicPaymentItem can either be a BasicPaymentProduct or a BasicPaymentProductGroup. The list of basic payment items does not contain any payment products that have a payment product group associated with them. The following code fragment shows how instances of BasicPaymentItem, BasicPaymentProduct and BasicPaymentProductGroup can be retrieved from an instance of PaymentItems.
//Get a BasicPaymentItem
let basicPaymentItem = paymentItems.paymentItem(withIdentifier: "1")

//Get a BasicPaymentProduct
let basicPaymentProduct = paymentItems.paymentItem(withIdentifier: "1") as? BasicPaymentProduct

//Get a BasicPaymentProductGroup
let basicPaymentProductGroupId = "cards" //Currently this is the only available group
let basicPaymentGroup = paymentItems.paymentItem(withIdentifier: basicPaymentProductGroupId) as?
                            BasicPaymentProductGroup
BasicPaymentItem
Instances of the interface BasicPaymentItem expose three methods that can primarily be used for easily rendering a BasicPaymentProduct and BasicPaymentProductGroup on the same page.
BasicPaymentProduct & BasicPaymentProductGroup
The SDK offers four classes to represent information about payment products: BasicPaymentProduct, its subclass PaymentProduct, BasicPaymentProductGroup and its subclass PaymentProductGroup. Practically speaking, instances of BasicPaymentProduct and BasicPaymentProductGroup contain the information required by users to distinguish a payment product (group) from others in a list of available options. The classes PaymentProduct, and PaymentProductGroup are described below.
Based on the information contained by an instance of PaymentItems and the instances of BasicPaymentProduct and BasicPaymentProductGroup it contains, a graphical representation of a list of available payment items can be automatically generated, from which a customer can select one. Each instance of BasicPaymentProduct contains
- an identifier,
- a field indicating the payment method of this product,
- a field indicating the payment product group this product belongs to,
- a field indicating whether payment data can be stored as an account on file,
- a field indicating whether payment data can be stored automatically as an account on file,
- a field indicating whether or not a recurring payment can be processed with this payment product,
- a list of accounts on file for this payment product,
- display hints that can be used to render the BasicPaymentProduct, containing:
- an index indicating at which position the payment product belongs in a list of payment products, and
- a logo.
Instances of BasicPaymentProductGroup contain
- an identifier,
- a list of accounts on file for payment products in this group,
- display hints that can be used to render the BasicPaymentProductGroup, containing:
- an index indicating at which position the payment product belongs in a list of payment products, and
- a logo.
In the code fragment below, the label and logo for a payment product are retrieved. The Swift SDK offers internationalization and localization, which is illustrated in this example. The localized label for the payment product is retrieved using a key based on the identifier of the payment item. Its value depends on the locale of the customer's device.
let bundle = Bundle(path: SDKConstants.kSDKBundlePath!)!
let key = "gc.general.paymentProducts.\(basicPaymentProduct.identifier).name"
let label = NSLocalizedString(key, tableName: SDKConstants.kSDKLocalizable, bundle: bundle,
                            value: "", comment: "")
let logo = basicPaymentProduct.displayHints.logoImageAccountOnFile
Instances of the class BasicPaymentProduct and BasicPaymentProductGroup have a list of accounts on file which are an instance of AccountOnFile. This represents information about an account on file for a certain payment product. It contains
- an identifier for the account on file,
- an identifier for the corresponding payment product,
- a collection of values that have been stored as part of the account on file,
- display hints that contain information about how the account on file should be rendered
- a method that produces a label that describes the account on file.
The code fragment below shows how the label for an account on file can be retrieved. This label can be shown to the customer, along with the logo of the corresponding payment product, to enable the user to distinguish one account on file from another.
let label = accountOnFile.labelPaymentProduct & PaymentProductGroup
As explained above, BasicPaymentProduct and BasicPaymentProductGroup only contain the information required by a customer to distinguish one payment item from another. However, once a payment item or an account on file has been selected, the customer must provide additional information, such as an adress, a bank account number, a credit card number, or an expiry date, before a payment can be processed. Each payment item can have a number of fields that need to be completed to process a payment. Instances of BasicPaymentProduct and BasicPaymentProductGroup do not contain any information about these fields.
Information about the fields of payment items is represented by instances of PaymentProductField, which are contained in instances of PaymentProduct and PaymentProductGroup. The class PaymentProductField is described below. The session component can be used to retrieve instances of PaymentProduct, as shown in the following code fragment.
let paymentProductId = "xyz"
session.paymentProduct(withId: paymentProductId, context: context,
                            success: { paymentProduct in
    // Create a payment request using the payment product
    // represented by paymentProduct.
}, failure: { error in
    // Indicate that an error has occurred.
})
Instances of PaymentProductGroup can be retrieved as shown in the fragment below.
let paymentProductGroupId = "cards"
session.paymentProductGroup(withId: paymentProductGroupId, context: context,
                            success: { paymentProductGroup in
    // Create a payment request using the payment product group
    // represented by paymentProductGroup.
}, failure: { error in
    // Indicate that an error has occurred.
})
PaymentProductField
The fields of payment items are represented by instances of PaymentProductField. Each field has an identifier, a type, a definition of restrictions that apply to the value of the field, and information about how the field should be presented graphically to the customer. Additionally, an instance of a field can be used to determine whether a given value is a valid value for the field.
In the code fragment below, the field with identifier “cvv” is retrieved from a payment product. The data restrictions of the field are inspected to see whether this field is a required field or an optional field. Additionally, the display hints of the field are inspected to see whether the values a customer provides should be obfuscated in a user interface. Finally, the value “123” is validated and the number of validation errors is inspected to see whether the provided value is valid.
if let field = paymentProduct.paymentProductField(withId: "cvv") {
    let isRequired = field.dataRestrictions.isRequired
    let obfuscate = field.displayHints.obfuscate
    field.validateValue("123")
    let validValue = field.errors.count == 0
}
ValidationError and its subclasses
The class ValidationError has a number of descendants, each representing a different type of validation error. These errors can be used to give customers feedback when there are issues with the information they provide.
- ValidationErrorLength indicates that the supplied value has an invalid length. The minimal length is defined by the property minLength and the maximal length is defined by the property maxLength.
- ValidationErrorRange indicates that the supplied value does not fall within the required range of values. The smallest value is defined by the property minValue and the largest value is defined by the property maxValue.
- ValidationErrorExpirationDate indicates that the supplied value is not a valid expiration date.
- ValidationErrorFixedList indicates that the supplied value is not one of the available options in a given fixed list of options.
- ValidationErrorLuhn indicates that the supplied value does not pass the Luhn check for payment card numbers.
- ValidationErrorRegularExpression indicates that the supplied value does not satisfy a given regular expression.
- ValidationErrorIsRequired indicates that no value has been supplied for a required field.
- ValidationErrorInteger indicates that the supplied value is not an integer.
- ValidationErrorNumericString indicates that the supplied value is not a numeric string.
- ValidationErrorEmailAddress indicates that the supplied value is not a valid e-mail address.
- ValidationErrorAllowed indicates that the supplied value is not allowed in the current payment contect.
The code fragment below shows how a localized error message can be constructed for an instance of ValidationErrorLength after casting an instance of ValidationError.
if let lengthError = error as? ValidationErrorLength {
    let key = String("gc.general.paymentProductFields.validationErrors.%@.label": format, "length")
    let value = NSLocalizedString(key, tableName: SDKConstants.kSDKLocalizable, bundle: bundle,
                            value: "", comment: "")

    let errorMessage = String(format: value, lengthError?.minLength, lengthError?.maxLength)
}
PaymentRequest
Once a payment product has been selected and an instance of PaymentProduct has been retrieved, a payment request can be constructed. This class has a property tokenize, which is used to indicate whether a payment request should be stored as an account on file. The code fragment below shows how a payment request should be constructed when no account on file is selected and the request should not be stored as an account on file.
let paymentRequest = PaymentRequest()
paymentRequest.paymentProduct = paymentProduct
paymentRequest.tokenize = false
If the customer selected an account on file, both the account on file and the corresponding payment product must be supplied while constructing the payment request, as shown below.
let paymentRequest = PaymentRequest()
paymentRequest.paymentProduct = paymentProduct
paymentRequest.accountOnFile = accountOnFile
paymentRequest.tokenize = false
Instances of AccountOnFile can be retrieved from instances of PaymentProduct or BasicPaymentProduct as follows.
let paymentProductId = "xyz"
let accountOnFileId = "abc"
let product = paymentProducts.paymentProduct(withIdentifier: paymentProductId)
let accountOnFile = product?.accountOnFile(withIdentifier: accountOnFileId)
Once a payment request has been configured, the values for the payment product's fields can be supplied as follows. The identifiers of the fields, such as “cardNumber” and “cvv” in the example below, are used to set the values of the fields using the payment request.
paymentRequest.setValue("1234567890", forField: "cardNumber")
paymentRequest.setValue("123", forField: "cvv")
Some of the fields of the payment products are associated with a mask. These masks should be applied to the input provided by customers before the input is shown on the screen. In most apps, customers will be able to edit the values for payment product fields using a text field, which means that the cursor position should be updated while applying the mask. If a mask defines that characters should be inserted in a string and this insertion takes place at a position before the position of the cursor, the cursor position should be moved to the right. A payment request is able to compute the masked value and the new cursor position for each of the fields of the corresponding payment product, as shown in the following code fragment.
let identifier = "cardNumber"
let cursorPosition = 4
let formattedString = paymentRequest.maskedValue(forField: identifier, cursorPosition: cursorPosition)
Once all values have been supplied, the payment request can be validated, as shown below. After validation, a list of errors is available, which indicates the problems that occurred during validation. If there are no errors, the payment request can be encrypted and sent to Worldline. If there are validation errors, the customer should be provided with feedback about these errors as explained above.
paymentRequest.validate()
if paymentRequest.errors.count == 0 {
    // The payment request is valid, and can be encrypted and sent to
    // the Worldline platform via the merchant's server.
}
else {
    // Notify the user that some fields contain invalid data.
}PreparedPaymentRequest
Once a payment request has been validated, it can be encrypted and sent to the Worldline platform. The code fragment below shows how an instance of Session can be used to encrypt a request. The result is an instance of the class PreparedPaymentRequest. It has two properties, encryptedFields and encodedClientMetaInfo, which are the strings that should be sent to the Worldline platform.
session.prepare(paymentRequest, success: { preparedPaymentRequest in
    // Submit the information contained in the encrypted
    // payment request represented by preparedPaymentRequest
    // to the Worldline platform via your server.
}, failure: { error in
    // Indicate that an error has occurred.
})
Issuer identification number check
The first six digits of a payment card number are known as the Issuer Identification Number (IIN). An instance of Session can be used to check which payment products are associated with an IIN. The check is performed asynchronously, which means that the result of the check is not available immediately. The result of this check is an instance of IINDetailsResponse. This class has a couple of properties, being:
- An IINStatus that indicates the result of the check. The different possible statusses are:
- The value .supported indicates that the IIN is associated with a payment product that is supported by the Worldline platform.
- The value .unknown indicates that the IIN is not recognized.
- The value .notEnoughDigits indicates that fewer than six digits have been provided.
- The value .pending indicates that another request is already pending.
- The value .existingButNotAllowed indicates that the IIN is recognised, but that it cannot be payed with in the current situation.
- A field that holds the identifier of the primary payment product that is associated with this IIN.
- A field that holds the country code of the primary payment product that is associated with this IIN.
- A field that indicates whether it is allowed to do a payment with the primary payment product based on the payment context.
- A list of instances of IINDetail, which depict co-brands for the current IIN.
It is possible that a single credit card has multiple brands associated to it. We call these co-brands. The details of the first payment product, that can be payed with in the current payment context, are always stored in the toplevel fields of the IINDetailsResponse. If a card is a multibranded card, the list of instances of IINDetail contains all brands associated with the card, including the payment product that is stored in the toplevel fields. This list can be used to show the customer he can chose what payment product he wants to be paying with. If there is only one payment product associated with the credit card the list of IIN Details is empty.
If the value of status is not Supported the other fields of IINDetailsResponse will all be nil (or false in case of the allowedInContext field).
The code fragment below shows how an instance of IINDetailsResponse can be obtained.
func doIINLookup() {
    guard let unmasked = paymentRequest.unmaskedValue(forField: "cardNumber") else {
        fatalError("Payment request did not contain cardNumber field")
    }

    session.iinDetails(forPartialCreditCardNumber: unmasked, context: context, success: { response in
        if response.status == .supported {
            if !response.coBrands.isEmpty {
                if !self.isSelectedPaymentProduct(inCoBrands: response.coBrands) {
                    self.switchToPaymentProduct(response)
                }

                // EU legislation requires that, in the case of
                // a card with multiple brands, a customer can
                // choose what brand he wants to do the payment
                // with.

                self.showCoBrandNotification()
            } else if response.paymentProductId != self.paymentItemIdentifier {
                self.switchToPaymentProduct(response)
            }
        }
        else {
            //Handle other status codes.
        }
    }, failure: { error in
        // Indicate that an error has occurred.
    })
}

func isSelectedPaymentProduct(inCoBrands cobrands: [IINDetail]) -> Bool {
    return cobrands.contains { $0.paymentProductId == paymentItemIdentifier }
}

func switchToPaymentProduct(_ response: IINDetailsResponse) {
    if response.allowedInContext, let itemId = response.paymentProductId {
        // Switch to the payment product that actually is in the top level
        // Iin Details Response.
        paymentItemIdentifier = itemId
    }
    else {
        // Provide the customer with an error message that shows that the
        // credit card number he is entering can currently not be payed
        // with.
        // Show the customer that he may choose
        // another brand to pay with.
    }
}

func showCoBrandNotification() {
    // Show the customer that he may choose
    // another brand to pay with.
}
Converting amounts
To help converting amounts from one currency to another, the SDK offers the convertAmount method of the Session class. This method takes an amount in cents, and a source and target currency, which are both three-letter ISO currency codes, and returns the converted amount in cents. The code fragment below shows how an amount can be converted.
let amountInCents: = 10000
let source = "EUR"
let target = "USD"

session.convertAmount(amountInCents, withSource: source, target: target,
                            success: { convertedAmountInCents in
    // Use the converted amount.
}, failure: { error in
    // Indicate that an error has occurred.
})
Retrieving a payment product directory
Certain payment products have directories that the consumer needs to pick from. An example is the list of banks for the Dutch iDeal payment product from which the consumer needs to select a bank. If you want to retrieve the directory information, you can use the directoryForPaymentProductId method of the Session class.
This method takes a payment product identifier, a three-letter ISO currency code, and an ISO 3166-1 alpha-2 country code and returns an instance of DirectoryEntries, as shown in the code fragment below.
let paymentProductId = "xyz"
let countryCode = "NL"
let currencyCode = "EUR"

session.directory(forPaymentProductId: paymentProductId, countryCode: countryCode,
                            currencyCode: currencyCode, success: { directoryEntries in
    // Use the directory entries.
}, failure: { error in
    // Indicate that an error has occurred.
})
Each instance of DirectoryEntries consists of a list of instances of DirectoryEntry, which contain the following information:
- the identifier of the issuing bank,
- the name of the issuing bank,
- the list of countries of the issuing bank, and
- a string that indicates how the issuers should be sorted.
Additional information
The classes PaymentProducts, BasicPaymentProduct, PaymentProduct, AccountsOnFile, AccountOnFile, PaymentProductField, and DirectoryEntries are wrappers for responses from the Client API. Additional information about the data represented by these classes is available in the documentation of the Client API.
Example app
The example app illustrates the possibilities of the Swift SDK and the services offered by Worldline. Its source code is available on GitHub . The example app consists of four screens:
- The first screen asks for the information necessary to communicate with the Client API and retrieves a list of payment items. This screen should not be part of an actual app in the app store. It is provided to illustrate which information is needed to initialize an instance of Session.
- The second screen is a dynamically generated payment item selection screen. Based on the input provided in the first screen, a list of available payment items and previously stored accounts on file is shown. This screen or a similar screen would typically be part of an actual app. It is described in more detail below.
- After selecting a payment item, the third screen is shown. This screen requests the information needed to complete the payment for the selected payment product. The provided information can only be submitted by the customer if it has been validated by the SDK. Also this screen or a similar screen would be part of an actual app and is described in further detail below.
- The fourth screen indicates that the initiated payment has been successfully processed by the SDK. This screen should not be part of an actual app in the app store.
Logging
In some cases, you may want to turn on logging of the requests and responses that make up the communication with Worldline. You can enable logging in the example app by installing the 'AFNetworkActivityLogger' library through Cocoapods. To do this add the line below to the Podfile.
pod 'AFNetworkActivityLogger'Now run 'pod install' from your project directory and then Add the following lines to the 'didFinishLaunchingWithOptions:' method in IngenicoConnectExample\AppDelegate.swift of the example app.
AFNetworkActivityLogger.sharedLogger().level = .AFLoggerLevelDebug
AFNetworkActivityLogger.sharedLogger().startLogging()
Payment product selection screen

The payment product selection screen provides an example for one of the two screens that will appear in most apps that use the Swift SDK. It shows a list of available payment items and accounts on file. For each payment item, a localized name is shown, and for each account on file, a short description of the stored information is shown. If a logo is available for a payment item, this logo is also shown. The screenshot to the left shows the payment product selection screen. It contains a part of a list of available payment items, generated from the information contained in an instance of PaymentItems.
Payment product input form screen

The screen that shows the input activity for a selected payment item or account on file is another example of a screen that will appear in most apps that use the Swift SDK. It is shown after selecting a payment item or an account on file. If the customer has selected an account on file, some of the required values will already be filled in and cannot be changed. The screenshot to the left shows the payment item input screen. The input form is generated from an instance of PaymentProduct or PaymentProductGroup.
Form validation
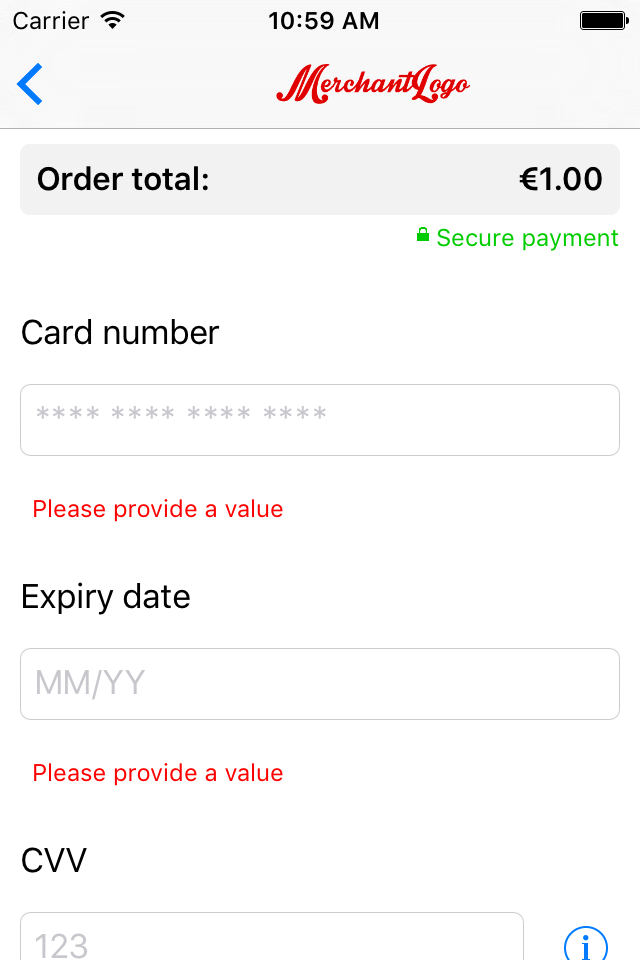
The example app uses the SDK to validate the input provided by the customer when the pay button is pressed. If the provided data is invalid, error messages are shown below the invalid values. The screenshot below shows the payment product input form screen after validation.
Additional information
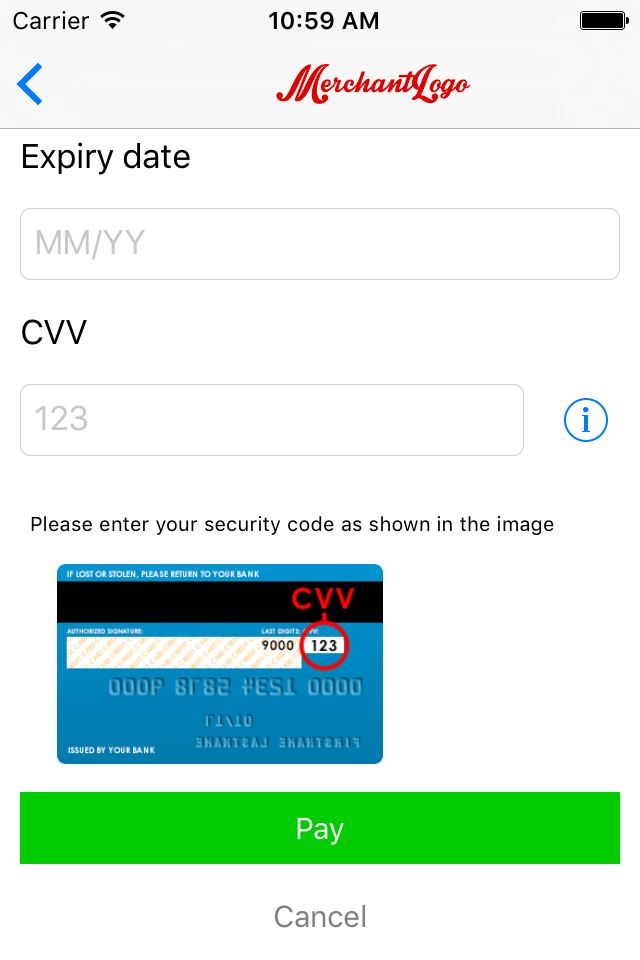
Some payment product fields might require some additional explanation. The information button next to the text field for the CVV code shown below indicates that additional information is available. The image shown when the customer presses the button is part of the display hints of the payment product field. The textual explanation is a localized string that is part of the SDK. The screenshot below shows the payment product input form screen after pressing the information button.
IIN check
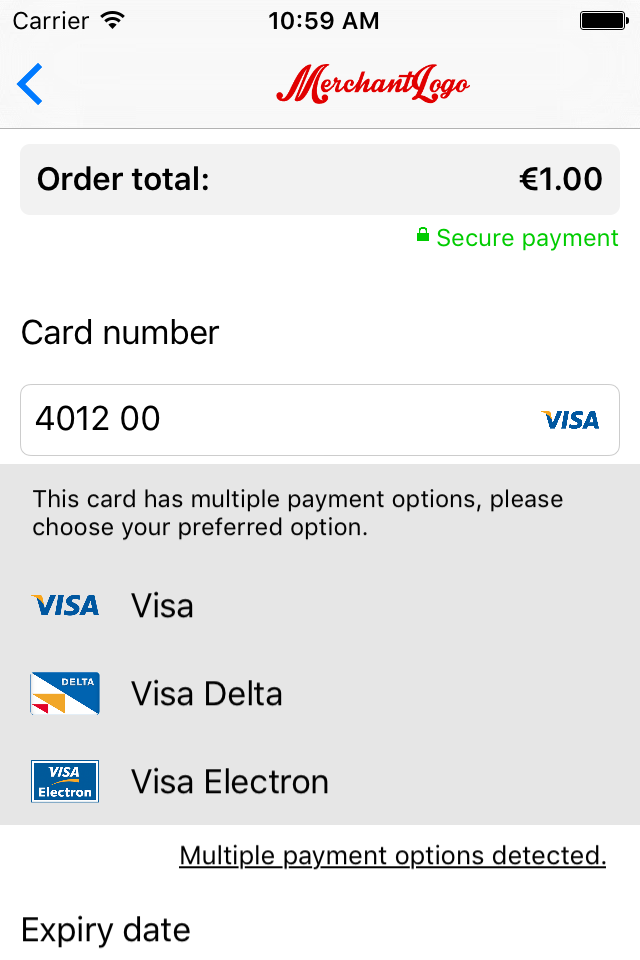
The example application also demonstrates the use of the IIN check described above. For each of the card-based payment products, an IIN check is performed once the customer has entered six or more digits in the text field for the card number. If the IIN is associated to the selected payment product, the logo of this payment product appears on the right-hand side of the text field. If the IIN is associated to another payment product, the input fields are replaced with the input fields for the new payment product automatically. The IIN check can also be used to switch from an PaymentProductGroup to a specific PaymentProduct.
The screenshot to the left also shows how the co-brands that may be associated to a certain card may be rendered. The payment product logo and name of the co-brands are retrieved by doing specific calls for them.