Webhooks
Webhooks notify you about events that occur with regards to the payments that you process via Worldline, like status changes on payments. You can select which type of events you want to be notified about and where we should send them to. This allows you to be easily aware of things that happen, even after the consumer is no longer on your site.
When to use webhooks?
You want to be informed whenever an event occurs in your Worldline account. Webhooks provide this information by making a POST request to one or more HTTPS endpoints on your server. Events can be triggered in two ways:
- Directly from an API call you make – events of this type only add a little value since you'll be informed about them via the API response anyway.
- Something "out of your sight" – events of this type are more interesting to have webhooks notifications enabled.
Let's take a look at an example. The online authorization of a redirect payment only happens after the consumer finishes the process at the 3rd party provider. This action is not visible to you as the consumer is not on your website. You could periodically check the current payment status using our API ("poll"), but it's not very efficient. Using webhooks, however, you can subscribe to one or more payment events, which will trigger us to make a POST request to an HTTPS endpoint on your server when the payment status changes. Or, in webhooks terms, when the "event occurs."
We'll include the complete JSON payment object in that message so you have all relevant information directly at hand.
Currently, we support events that happen on payments, payouts, and refunds. Please check the webhooks event types to see all events that webhooks can inform you about.
Before you start using webhooks
- Configure webhooks in the Configuration Center. This way we know which events you're interested in and to which endpoints we should send them.
- Set up your webhooks endpoint. It means that you need to build an application that handles incoming webhooks events and run that on an HTTPS endpoint on your server. Our server SDKs can help you with common tasks like translating the JSON into objects and signature verification. Please also notice the S in HTTPS, since we only support encrypted communication. Your application should be able to:
-
- respond to get GET action and echo the 'X-GCS-Webhooks-Endpoint-Verification' header value in the body
- respond to the POST action with a 2XX status code for all events delivered
- validate the signature on the message
Configuring webhooks in the Configuration Center
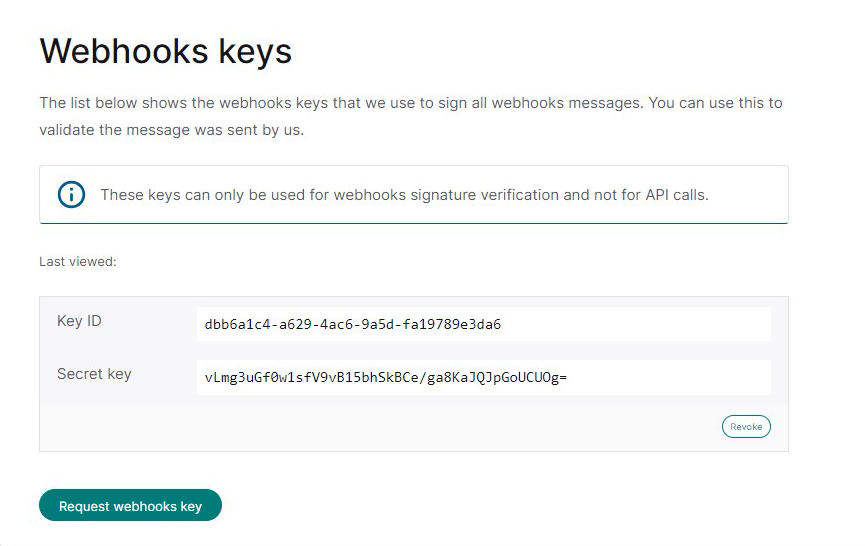
- Create a webhooks key.
You can do this in the Configuration Center on the "webhooks keys" page. Click on the "request webhooks key" button. Just like with the API key, it's used to sign the messages that are sent between you and us.
In the webhooks case we sign the message and you should verify the signature to make sure that it was indeed sent by us. Verification of the signature occurs automatically if you use one of our server SDKs, or plugins. Since webhooks keys are defined per account they are used to sign the messages of all our listed merchant IDs. You do not need to create a webhooks key per merchant ID.
- Add one or more webhooks endpoints.
If you have more than one merchant ID connected to your account then first select the merchant ID for which you would like to add an endpoint. Then open the "webhooks" page, and click on the "add endpoint" button. Provide the endpoint's secure (HTTPS) URL and select which type of events it needs to receive. You can either choose to subscribe to all event types or to a subset that you can select in the popup as well.

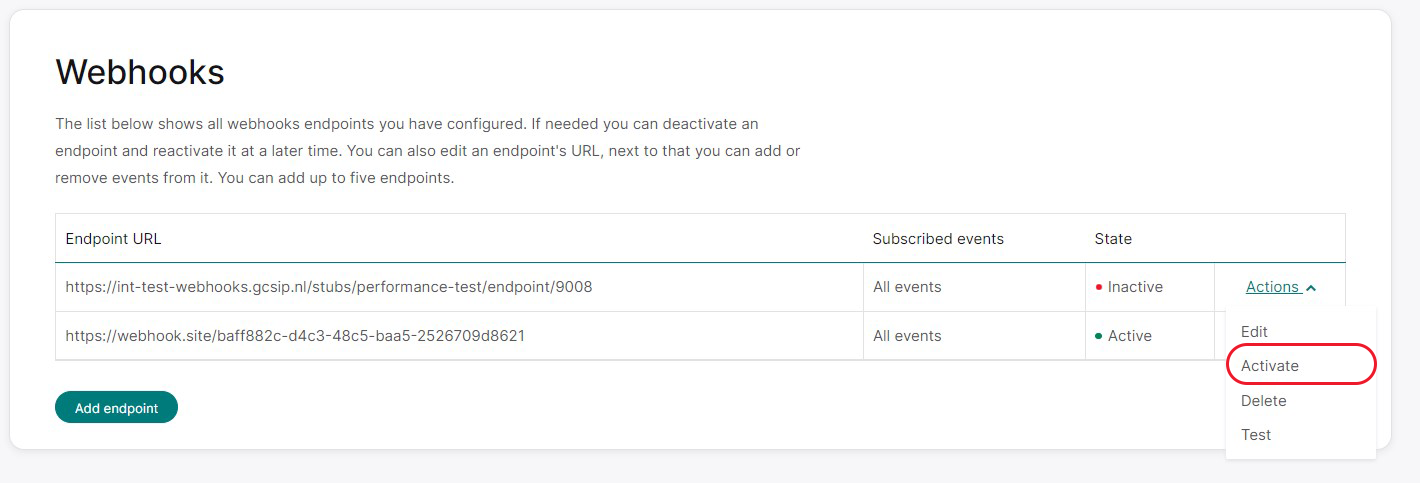
To ensure the URL is a valid webhooks endpoint, we send an HTTPS GET request to it as soon as it's created. This request includes a random string in the "X-GCS-Webhooks-Endpoint-Verification" HTTP header. The endpoint's response should be a plain text body containing only this header's value.
If your endpoint fails to do this, it will still be added to your list of endpoints as deactivated. If this happens, you can fix the issue on your end and then use the endpoint's "activate" action later, which will trigger the validation call again. The endpoint will start receiving messages a couple of minutes after it has been successfully activated.
- You can add up a maximum of five endpoints per merchant ID. You can only have one endpoint subscribed to a specific event.
- Webhooks can take up to 10 minutes to react to changes you made in the Configuration Center.
- Please see the FAQ below for more details on configuring webhooks.
Setting up your webhooks endpoint
The webhooks messages will be sent to your endpoints via HTTPS POST requests. The request's body contains JSON that describes the event and the object on which the event occurred. These objects' structure is identical to those that are returned in our REST API. For instance, the "payment" object in a webhooks message is identical to the object returned by the GET payment REST endpoint. See the webhooks event structure for a detailed explanation of the webhooks message.
To handle these incoming messages, you should set up your server to perceive both POST and GET requests on the endpoints you've set up in the Configuration Center:
- POST – to handle the actual messages
- GET – for the URL validation, as mentioned in the previous section
The way it's done depends on your server technology. If you're using one of our plugins, you can simply use the plugin's configuration page to set this up.
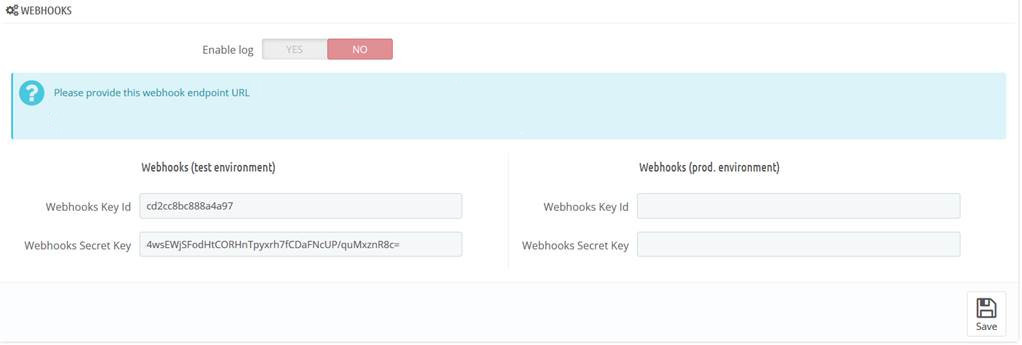 The PrestaShop webhooks screen where merchants can configure the webhooks keys.
If you cannot use one of the plugins, you should configure the framework you're using to perceive the endpoints and pass the request to our SDK. The SDK will check the signature and return an actual object instead of the JSON included in the request. You can then pass this data to your own business logic.
Responding to a webhooks event
All successfully received webhooks messages should return an HTTP status code in the 2xx range. Any additional information in the body or header is ignored. Whenever an endpoint responds with a status code out of that range, webhooks assume that your endpoint didn't receive the message and will retry later. It means that HTTP redirects, which are 3xx codes, will also fail. See "retrying failed events" for more information on how webhooks perform retries.
If an endpoint doesn't respond within 10 seconds, webhooks will also assume your endpoint didn't receive the message, and we'll retry later. To prevent this, it's important to decouple as much of your business logic from the handling of the request as possible. Please respond with a 2xx HTTP status code immediately after receiving the message and handle all other tasks afterward.
Testing webhooks endpoints
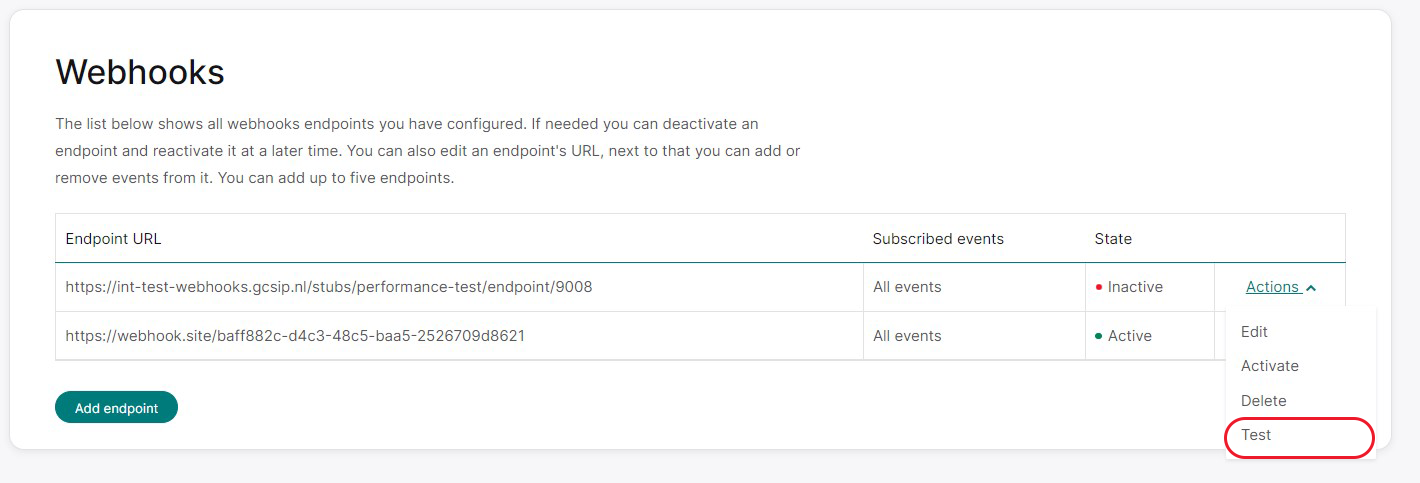
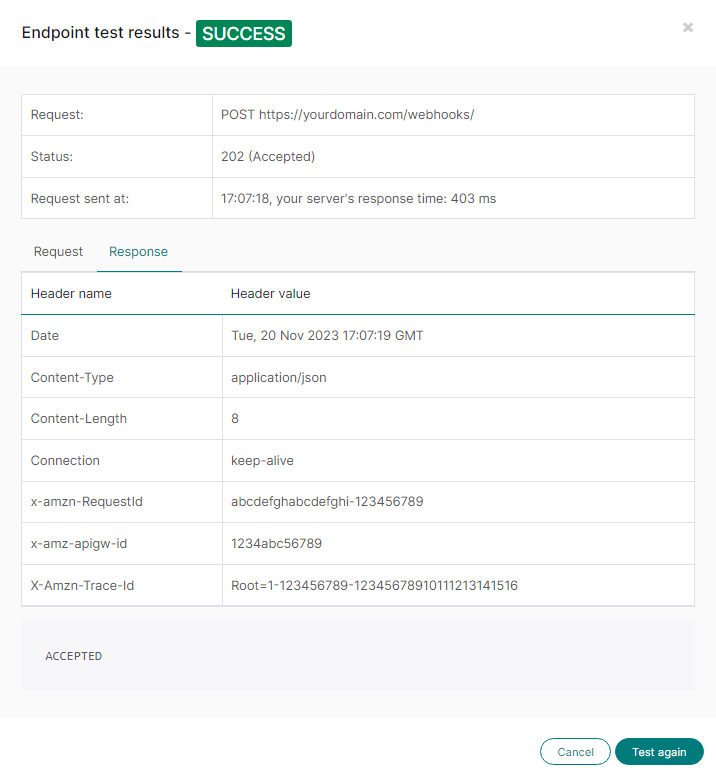
Now, you can use the Сonfiguration Сenter to test your endpoints. Select your desired merchant ID, and go to the "Webhooks" page. You can choose the endpoint you want to test, click the "Actions" dropdown menu, and select "Test." This action will result in webhooks executing a POST request to that endpoint with a dummy event.
In the popup, you can see whether the test was successful or something went wrong. Successful means that we could reach your endpoint, and it responded with the expected 2xx status code before the request timed out. The popup also shows you the request we made, the response we received from the endpoint, and how long it took for the endpoint to reply.
Common issues found while testing
| Issue | Solution |
|---|---|
| An endpoint redirect to a different URL using an HTTP 30x status code. | Webhooks does not accept redirects. The required response status code needs to be in the 2xx range. |
| The request times out before the endpoints return a response. |
Make sure your endpoint responds within 10 seconds. |
The test described above only checks if webhooks can reach the endpoint. To test if an endpoint handles the different event types correctly, you need to use our REST API to make calls that trigger the desired event. For example, if you want to test handling a "captured" event on a payment object, create a payment using the REST API to trigger a "captured" event. You can use our pre-production environment to make these test calls without actually making payments.
Operational considerations
We'll send events to the endpoints as quickly as possible, typically a few seconds after occurrence. The first delivery attempt will occur within 24 hours of the event's creation time. In rare circumstances, the delivery may take longer.
Some known limitations are:
- The sequence of events we send may not always match the order in which they happened. While they are generally in order, there are instances where this may not be the case. For example, if the initial delivery of an event fails and a second event succeeds before a retry, the order may vary.
- An event may be sent multiple times. To prevent duplicates, you can ensure that the unique ID assigned to each event has not been processed before.
How webhooks will retry failed deliveries of events
Whenever an endpoint doesn't successfully receive a message, two things will happen:
- If an endpoint fails too often, we stop sending messages to it by temporarily blacklisting the endpoint.
- We'll retry to send the failed message and all skipped messages later.
Blacklisting
If five consecutive messages cannot be delivered to an endpoint, we'll temporarily stop sending messages to that endpoint for 5 minutes. This is referred to as "blacklisting the endpoint." Any messages that were supposed to be sent during the blacklisting period will be sent later through the retry mechanism.
We use blacklisting because it's probable that the endpoint is either offline or overloaded, and it typically takes a few minutes for it to become operational again. Attempting to send messages during this period would likely lead to failed deliveries, further overloading the already troubled endpoint.
Retrying failed messages
We will make multiple attempts to deliver each unsuccessful message, and with each unsuccessful attempt, we will increase the delay before resending the message. The schedule below outlines the retry times in relation to the initial delivery attempt. For example, the 7th retry will occur 8 hours after the first attempt to send the event to the endpoint. The 8th retry will then take place another 8 hours later, making it a total of 16 hours since our initial attempt.
| Retry attempt | Retry time relative to first delivery attempt |
| 1 | immediately |
| 2 | 5 minutes |
| 3 | 1 hour |
| 4 | 2 hours |
| 5 | 4 hours |
| 6 | 6 hours |
| 7 | 8 hours |
| 8 | 16 hours |
| 9 | 24 hours |
| 10 | 48 hours |
After 10 retry attempts, which equates to 48 hours from our initial try, we classify an event as undeliverable. While we currently don't provide a manual option for resending events, you can use our REST API to check the status of the specific objects you're concerned about.
FAQ
-
Show Hide
Which webhooks key is used for the signing of messages if I have more than one?
The messages will be signed with the key that has been added first, so the oldest key is what we'll use. If we would use the most recently created key we could break the system since you would not have had time to configure the new key on your servers yet. The safest way to incorporate this on your end is to look at the request's X-GCS-KeyId HTTP header which contains the key id of the key that we used to sign the message. You can look up the secret key in your own configuration based on that key id.
-
Show Hide
Why isn't the existing REST API key used to also sign the webhooks messages.
For security it's best to have "separate keys for separate things". Signing REST API calls and verifying the signature of webhooks messages are two different things each with their own level of sensitivity. Having two keys allows you to handle signing REST API calls and verifying webhooks messages on different machines (with perhaps different security measures in place) without having to deploy a single "superkey" on both systems. It also allows us to handle the keys differently, as we for instance do with respect to the expiration time: the webhooks key does not expire, but the REST API key does.
-
Show Hide
Why don't webhooks keys expire while the keys used for signing the REST API calls do?
Since the REST API calls can contain sensitive card information PCI/DSS requires us to use keys that expire. Adding an expiration date to a key requires you to periodically change these keys, so it increases the complexity of your operational processes. Since the webhooks messages do not contain any sensitive card information we decided to not use expiration dates on the webhooks keys so we can keep the webhooks integration as simple as possible.
-
Show Hide
I don't use the SDKs. How do I check the webhooks message signature?
You can always manually validate the signature. The validation process works as follows:
- Retrieve the key id from the X-GCS-KeyId header.
- From your own configuration: retrieve the webhooks secret key belonging to that webhooks key id.
- Retrieve the body of the request and convert it to bytes using UTF-8 encoding.
- Create an HMAC-SHA256 signature of the resulting byte array and the webhooks secret key.
- Encode the created signature using base64.
- Retrieve the signature we created from the request's X-GCS-Signature HTTP header and verify it is the same as the base64 encoded signature you just created.
- Below is an example in Java.
String signature = getHeaderValue(requestHeaders, "X-GCS-Signature");
String keyId = getHeaderValue(requestHeaders, "X-GCS-KeyId");
String secretKey = secretKeyStore.getSecretKey(keyId);

Mac hmac = Mac.getInstance("HmacSHA256");
SecretKeySpec key = new SecretKeySpec(secretKey.getBytes(CHARSET), "HmacSHA256");
hmac.init(key);

byte[] unencodedResult = hmac.doFinal(body);
String expectedSignature = Base64.encodeBase64String(unencodedResult);

boolean isValid = areEqualSignatures(signature, expectedSignature);
You can of course also copy the validation code from the SDKs. The table below contains links to the SDK files in Github that contain the relevant code.
SDK / Language SDK file Method or function in file .NET WebhooksHelper.cs ValidateBody Go webhooks/Helper.go validate Java WebhooksHelper.java validateBody Node.js webhooks/index.js validateBody PHP WebhooksHelper.php validateBody Python 2 web_hooks_helper.py __validate_body Python 3 web_hooks_helper.py __validate_body Ruby webhooks_helper.rb validate_body -
Show Hide
How do I safely change the webhooks key without losing the ability to validate messages?
Changing the webhooks key needs to be done carefully because otherwise the events that are sent to you may be signed with a key that you do not have configured yet. It's best to follow these steps:
- Create a second key in the configuration center. Webhooks will still sign all events with old one.
- Now add the new key to your server configuration. Do not override the old one, just add it.
- Now delete the old key in our configuration center. From that moment we will sign the messages with the new key
- For a couple of minutes the incoming messages can be signed with either the new or the old key depending on if they were signed before or after the deletion of the old key. It's important that your code uses the X-GCS-KeyId to determine which key should be used for validating. If you are using the eCommerce plugins this will be done automatically as long as you configure the plugin with both the old and the new webhooks key. Keep in mind that messages that are in our retry queue will be signed with the new key at the moment they are sent again.
- After an hour you can safely remove the old key from the plugin config so the only key that is still configured is the new one.
-
Show Hide
I changed the webhooks configuration in the configuration center but the changes aren't picked up. What can I do?
It can take up to 10 minutes for webhooks to have picked up changes you made using the configuration center. Both for webhooks key changes and for endpoint changes, including activating or deactivating endpoints.
-
Show Hide
Can I use an HTTP instead of HTTPS endpoint?
No, we do not allow HTTP endpoints, because the message body can contain privacy sensitive information. HTTPS endpoint should listen on the default port (443), non default ports are not supported.
-
Show Hide
Can I add two identical endpoints with a different set of subscribed events?
No, all endpoints need to be unique within one merchant, even without taking the subscribed events into account. We do this to prevent merchants from mistakenly adding two identical endpoints. As an easy fix you can add dummy query parameters to one of the endpoint's URL so they become different.
-
Show Hide
What happens when an endpoint is deleted?
We will stop sending messages to that endpoint. It can take up to 10 minutes for webhooks to have picked up this change.
-
Show Hide
Will I receive webhooks messages for events that were triggered by a different account on a merchant that we both manage?
In some setups two or more accounts manage the same merchant. If one of those accounts triggers an event then all subscribed endpoints of all accounts that manage that merchant will receive a webhooks messages. The message is signed with the webhooks key of the account the endpoint belong to, so you will be able to verify the signature. The message itself does not show which account triggered the event, if any. If your integration makes use of this setup make sure to handle this scenario.
-
Show Hide
Does the configuration center show the endpoints that were created by other accounts for merchants that we both manage?
No, you can only see endpoints that were created by users of your own account.
-
Show Hide
Can I use the same endpoint for all merchants that my account manages?
Yes, you can use the same endpoint since the merchant id is part of the message body.This makes it possible for your single endpoint to figure out for which merchant the message is meant. However: you will have to add that endpoint to each merchant separately in the configuration center.
-
Show Hide
Which versions of the SDKs have webhooks support?
You should at least use the version of the server SDKs listed in the table below. Since the client SDKs don't handle any webhooks messages they do not feature are webhooks functionality.
SDK
Minimal version .NET 2.9.0 Go 1.8.0 Java 5.9.0 Node.js 2.7.0 PHP 5.9.0 Python 2 & 3 2.9.0 Ruby 1.9.0 -
Show Hide
Which IPs does webhooks use? I want to whitelist them.
Please do not use IP whitelisting restrictions, as our setup uses dynamic IP addresses. -
Show Hide
I received the same message twice, can this be prevented?
No, this can not be prevented in all cases. You should make sure you can handle these situations. Since all events have a unique id you can protect against this by verifying that an event's id has not already been handled earlier. Since the unique id is part of the message body and thus also included in the messages signature this check will also guard against replay attacks.
Here are some examples of when we'll send an event twice:
- Your endpoint did receive the message but the request timed out before you could send a proper response. We have no choice but to conclude that the delivery failed so we will retry sending the message at a later time. From your perspective this would look like us sending the same event twice.
- Your endpoint did receive the message but did not send back an HTTP status code in the 2xx range. We will also retry in such a case.
- The webhooks system experienced some issues and, for some event, wasn't able to reliably determine if they had already been delivered. These events will be send again to make sure that the endpoints received them at least once.
-
Show Hide
I receive too many webhooks messages in a short period of time, can this be prevented?
We do not limit the number of messages we send to an endpoint. So if you create one endpoint and subscribe it to all events it will be sent all these events shortly after they occur.
-
Show Hide
My web framework expects CSRF tokens but webhooks does not send these. What can I do?
CSRF tokens are a security measure that websites use to prevent cross-site request forgery attacks. Although this is a very important feature of the framework it will also prevent your server from successfully handling incoming webhooks requests. You will have to add an exception for the webhooks endpoints for webhooks to work properly.